Sunday 5 February 2012

Sharing Internet Connection In Win7

Sharing your Windows internet connection via software has traditionally been a tricky business.
Intel’s latest 32-bit and 64-bit drivers now include support, as do various others for Atheros, Broadcom, Realtek and other big players, but these don’t apply to every chipset.
Check the support site for your wireless adapter to see what’s available. 

The setup For sharing Connection is following:   

1. Connect your Win 7 PC to internet.
2. Click Start, type CMD, right-click the Cmd.exe and select “Run as Administrator”.
3. Now type the following commands (without ” ) :
4. " netsh wlan set hostednetwork mode=allow ssid=net key=password ” and press [Enter].
    (Replace“net” with the name you’d like to use for your custom network, and “password” with a
       password that’s of your choice).
5. " netsh wlan start hostednetwork ” and press [Enter] to start the virtual adapter .
6.  Now click Control Panel > Network and Internet > Network and Sharing Centre > Change Adapter
      Settings, right-click your internet connection and select Properties.
7.  Click the Sharing tab, check “Allow other network users to connect “, choose your virtual Wi-Fi
       adaptor – and that’s it. 

If you face any problem then post comment……

How to Unlock Samsung Galaxy SL i9003?

  1. Insert a non accepted SIM card on your phone
  2. Your phone will now display “SIM network unlock PIN” or “enter network code” GET YOUR SAMSUNG GALAXY SL I9003 UNLOCK CODE
  3. Enter the unlock code and press unlock
  4. Code accepted or network unlock successful phone will reboot
  5. Your phone is now unlocked to any GSM network
If the phone does not give the prompt to enter unlock PIN or network code, then:
  1. Switch ON your phone with a NOT ACCEPTED SIM Card
  2. Compose: #7465625*638*CODE# (or *#7465625*638*CODE#).
  3. Phone may reboot.

Populer Forks of Android

As we know, Android is open source mobile operating system developed by google. And Its all versions
Without  Honeycomb(Android 3.0-Tablet Version) are fully open source.
Lets see some its most famous forks(derived versions of android)
It is very famous among all android forks and it is built on android 2.3.5(Gingerbread).It provides many functionality which is not available in original android versions. This custom ROM has largest installation in world after original android.
 its totally iOS experience android fork developed by CHINISE community and based on same ginger bread.It is very attractive and has more user friendly UI. It has some own applications like own music player,dialer,contacs,etc.
3.Baidu Yi (Chinese: literally “Baidu Yi Platform”, meaning”change” or “easy”)
 It is an operating system for mobile devices. It is based on Google’s Android but is a fork by Baidu, the dominant search engine operator in China. It was announced on 2 September 2011 at the 2011 Baidu Technology Innovation Conference in Beijing. So far it is a vaporware, and you can’t see any progress or updates on their website.

How To Display Network Upload / Download Speed On The Panel In Ubuntu 11.04/11.10?

Indicator-Sysmonitor (System Monitor Indicator) is a really interesting Ubuntu indicator because it allows you to display pretty much anything on the Unity (or GNOME) panel by using a simple command or a bash script.
(Speaking of Indicator-Sysmonitor: a recent update brought sensors support (make sure you install hddtemp and lm-sensors), but this post isn’t about that)
Currently there is no AppIndicator to display the actual network usage as in the actual values on the Unity panel in Ubuntu 11.04. We have Indicator Multiload but it only displays a graph so I wrote a script for Indicator-Sysmonitor to display the network upload/download speed as well as CPU and Memory usage (Indicator Sysmonitor already has CPU and Memory usage but if you want to use a script, you must get your script to display the CPU and Memory usage independently).

Getting Indicator-Sysmonitor to display network upload / download speed

Before getting started, please note that while this worked just fine on my computer,
1. Firstly, install Indicator-Sysmonitor. For Ubuntu 11.04:
 
sudo add-apt-repository ppa:alexeftimie/ppa sudo apt-get update sudo apt-get install indicator-sysmonitor
If you use Ubuntu 10.10 (not working in Ubuntu 10.04!), download .deb from here.
2. Install dstat (this is required by my script):
sudo apt-get install dstat
3. Now you must download the script. Let’s create a folder (if it doesn’t exists already) called “scripts” in your home directory and download the script there:
mkdir -p ~/scripts && cd ~/scripts wget http://webupd8.googlecode.com/files/sysmon_0.2.tar.gz && tar -xvf sysmon_0.2.tar.gz
4. Setting Up System Monitor Indicator to use the script.
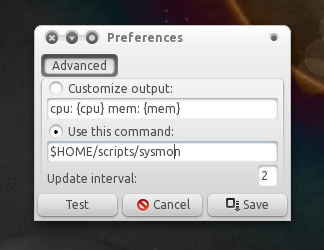
Now open Indicator-Sysmonitor (it should show up as System Monitor Indicator in the menu), then click it on the panel and select “Preferences” and under “Use this command”, enter this:
 
$HOME/scripts/sysmon
Indicator Sysmon
Then save. For me, each time I save the Indicator-Sysmon preferences, the applet freezes. If that’s the case for you too, run this in a terminal:
 
killall indicator-sysmonitor
Then start it again.
4. Configuring the script
Indicator sysmon
By default, the script displays the RAM and network usage. You can also display the CPU usage or any other combination (display the network usage only, display all: the CPU, ram and network, etc.). For this, open the script (run the following command in a terminal):
 
gedit ~/scripts/sysmon
And on top of the file you’ll see something like this:
#settings: netspeed=true ram=true cpu=false
What these do is pretty much obvious – change the items you want to be displayed on the panel to true and the rest to false. Feel free to tweak the script to display other stuff if you want.

Latex start up guide

 
Latex is a Document preparation suite for creating well formated reports,pdfs,e books,magazine and etc..
In this guide we will learn how to handle LaTeX at geek level not at expert level.
There are two tools which we will need to understand.
      1. Miktex-It is a compiler which will compile our document to generate pdf output.
(Download from here http://miktex.org/2.9/setup )
 
      1. Led-It is a latex editor. In which we will write our code and we will compile it using Miktex.
All latex file(code) has extension as a .tex and all bibliography file has extension as a .bbl
Some points to remember for easy understanding and handling:
      1. F7 is short cut key to compile your code in led.
      2. Please do back up before editing any code.
      3. If you found any error in compiling your code in led then type ‘H/h’ in console and press enter. It will show the error did by you.
      4. Most of all tags starts from \tag-name
      5. Some format needs its class to be in same directory where our tex fie is stored,like in IEEE format its class IEEEtrans.cls to be at same place where tex file is stored.
      1. All images which are included in our tex are to be stored at same place where tex file is.
How to do :
      1. Open LED.
      1. Open .tex file.
      1. Do modification in your way.
      1. Compile it using F7.
      1. Enable “Tools” menu in menu bar by right click.
      2. Open PDF(PDF symbol) in Tools menu.
      3. See your output in your installed pdf reader.
Examples of LaTex report formats:(Download Links are in brackets )
So modify it in your way and enjoy of doing LaTex.